Table of Contents
- Introduction
- Tools & Materials Needed
- Step 1: Prepare the Subfloor
- Step 2: Plan the Layout
- Step 3: Apply Tile Adhesive
- Step 4: Lay the Tiles
- Step 5: Add Tile Spacers & Leveling Clips
- Step 6: Cut Tiles for Edges and Corners
- Step 7: Grouting the Tiles
- Step 8: Final Cleaning and Curing
- Buy Floor Tiles and Installation Tools in Lucknow at Goel World
- Conclusion
1. Introduction
Whether you’re remodeling your living room, kitchen, or bathroom, floor tiles offer the perfect combination of durability and style. While professional installation is always recommended for large areas, with the right tools and instructions, you can learn how to install floor tiles yourself or understand the process better when working with a contractor.
2. Tools & Materials Needed
Before you begin, gather these essentials:
Tools:
- Tile cutter or wet saw
- Trowel (notched)
- Rubber mallet
- Level
- Measuring tape
- Chalk line
- Grout float
- Tile spacers
- Tile leveling clips
- Sponge and bucket
Materials:
- Floor tiles (ceramic, vitrified, or porcelain)
- Tile adhesive (thin-set mortar)
- Grout
- Primer (if needed)
- Sealant (optional for porous tiles)
3. Step 1: Prepare the Subfloor
A smooth, clean base is essential for successful tiling.
✅ Clean the floor of dust and debris
✅ Fix any cracks or bumps using a self-leveling compound
✅ Ensure the floor is dry and level
✅ Apply primer if required for better adhesion
4. Step 2: Plan the Layout
Start by measuring the room and planning your tile placement.
✅ Mark the center point using a chalk line
✅ Dry lay a few rows of tiles to visualize the layout
✅ Avoid placing small cuts or thin tiles at room edges
✅ Adjust layout to minimize cutting and wastage
5. Step 3: Apply Tile Adhesive
Use a notched trowel to spread adhesive evenly.
✅ Start in one quadrant from the center
✅ Spread only as much adhesive as you can cover in 10–15 minutes
✅ Maintain even thickness for tile level consistency
6. Step 4: Lay the Tiles
Place tiles firmly into the adhesive.
✅ Press tiles down gently and tap with a rubber mallet
✅ Ensure proper alignment with chalk lines
✅ Use a spirit level to check tile flatness
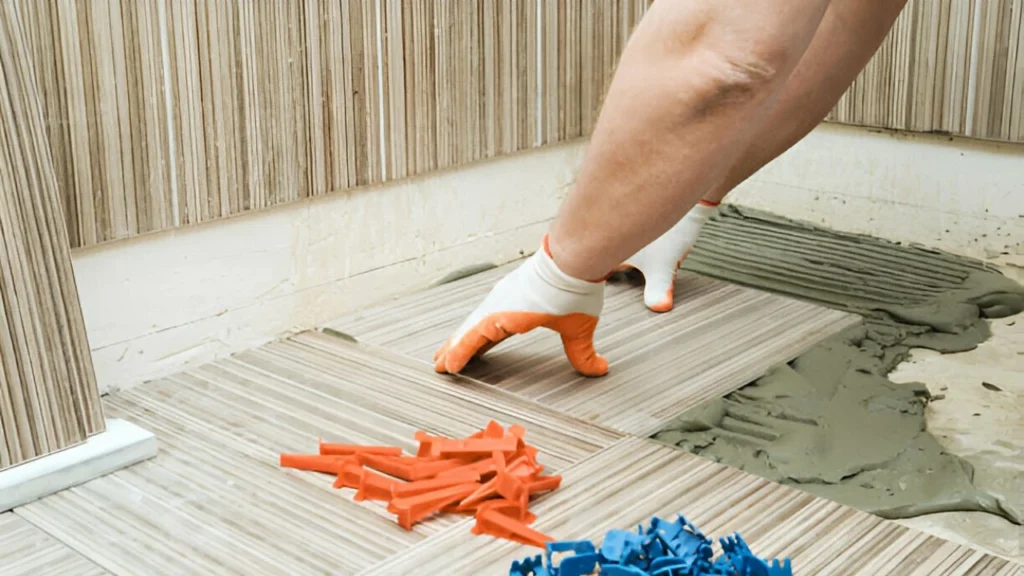
7. Step 5: Add Tile Spacers & Leveling Clips
For straight grout lines and flat surfaces:
✅ Use tile spacers (typically 2–3mm)
✅ Insert tile leveling clips to prevent lippage (uneven tiles)
✅ Let the adhesive cure for 24 hours
8. Step 6: Cut Tiles for Edges and Corners
Use a tile cutter or wet saw for clean cuts.
✅ Measure twice, cut once
✅ Use edge trims or corner profiles for a finished look
✅ Always wear safety goggles while cutting
9. Step 7: Grouting the Tiles
Once the tiles are firmly set:
✅ Mix grout and apply with a grout float
✅ Press grout into joints and remove excess
✅ Wipe the surface with a damp sponge after 10–15 minutes
✅ Allow grout to dry fully (usually 24 hours)
10. Step 8: Final Cleaning and Curing
✅ Buff the tiles with a clean cloth to remove grout haze
✅ Avoid foot traffic for 24–48 hours
✅ Apply sealant if using porous or natural tiles like stone or terracotta
11. Buy Floor Tiles and Installation Tools in Lucknow at Goel World
At Goel World, we offer everything you need for professional-quality tile installation:
✅ Ceramic, vitrified, porcelain, and natural stone tiles
✅ Tile adhesives, grouts, and waterproofing compounds
✅ Cutting tools, spacers, leveling clips, and tile trims
✅ Brands like RAK Ceramics, Johnson, Kajaria, and Somany
🏢 Visit our showrooms:
- Faizabad Road
- Sushant Golf City
Our experts will help you select the right materials based on your room type, climate, and budget.
12. Conclusion
Installing floor tiles is a step-by-step process that requires patience and precision. Whether you DIY or hire a professional, understanding the tiling process ensures better results and fewer issues in the future. For top-quality tiles and installation supplies in Lucknow, Goel World is your one-stop solution.